On the algorithms team at Stitch Fix, we aim to give everyone enough autonomy to own and deploy all the code that they write, when and how they want to. This is challenging because the breadth of who is writing micro-services for what, covers a wide spectrum of use cases - from writing services to integrate with engineering applications, e.g. serving styling recommendations, to writing dashboards that consume and display data, to writing internal services to help make all of this function. To complicate the matter, there is varying degrees of engineering abilities between the people who own each micro-service. In order to enable the team to build and deploy in a self-service way without causing internal carnage, we needed to come up with an easy, low-risk, highly repeatable process. After looking at the many deployment pipeline options out there, we settled on implementing the immutable server pattern[1].
What is the Immutable Server Pattern?
Immutable server pattern makes use of disposable components for everything that makes up an application that is not data. This means that once the application is deployed, nothing changes on the server - no scripts are run on it, no configuration is done on it. The packaged code and any deploy scripts is essentially baked into the server. No outside process is able to modify the contents after the server has been deployed. For example, if you were using Docker containers to deploy your code, everything the application needs would be in the Docker image, which you then use to create and run a container. You cannot modify the image once it’s been created, and if any changes do need to take place, you would create a new image and work with that one.
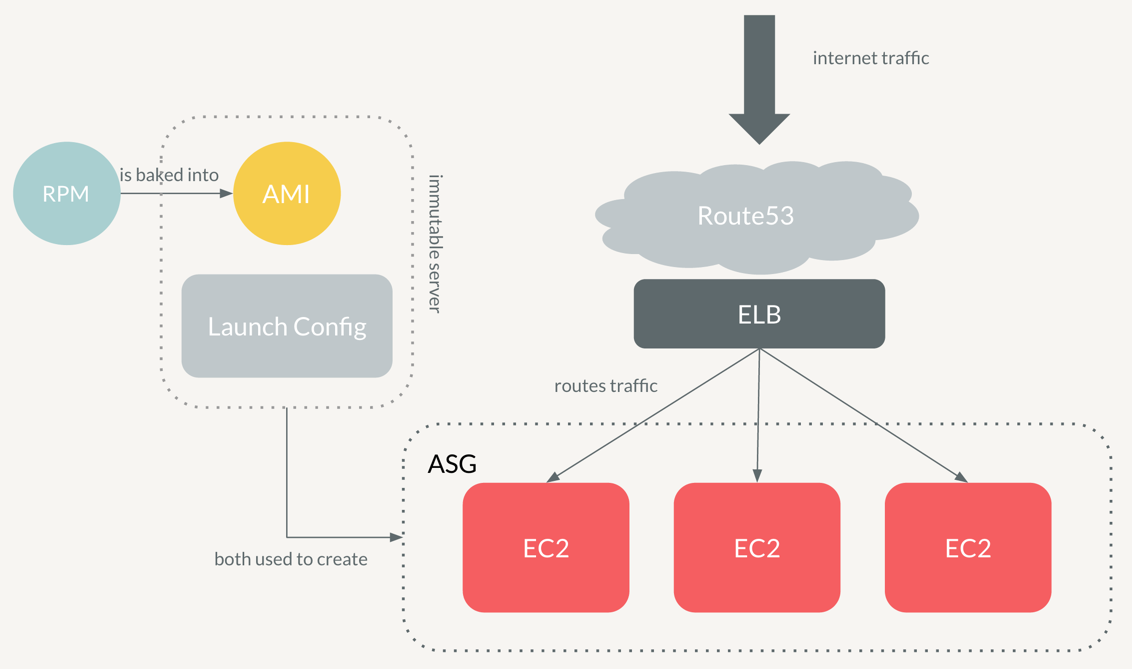
In our case, we use AWS Amazon Machine Images (AMIs) to accomplish the same thing. We make heavy use of Amazon Linux machines, which are Redhat-based, and thus package the code into RPMs[2]. The RPMs define all the dependencies for running the application, the code itself, and any startup scripts to run on bootup. The RPM is then installed on a clean base image of Amazon Linux, and an image is taken, resulting in an AMI. This AMI is synonymous with “immutable server” - it cannot be changed once it is created. The AMI is then deployed into an Auto Scaling Group (ASG) and attached to the Elastic Load Balancer (ELB). In this post, I’ll guide you through for a closer look at every step of this Immutable Server deploy pipeline. I’ll then go into how and why we embedded planned failures into this system. At the end, I’ll share the insights we’ve gained into the pros and cons of deploying in this way.
Implementing the Deployment Pipeline
Let’s say we have an application that we want to deploy into AWS. If you’re on the Algorithms team at Stitch Fix, this is most likely a python flask application, with gunicorn for multiprocessing, and fronted by nginx web server. We would call this application hello-world, and would expect to see it when we go to hello-world.internal-stitchfix-domain.com (<app-name>.internal-stitchfix-domain.com).
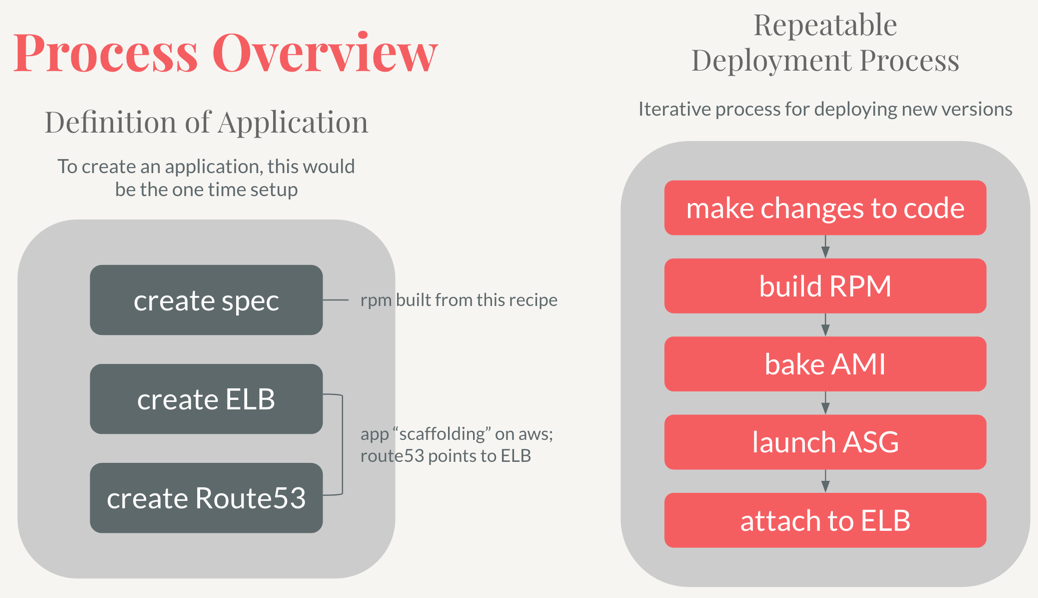
Step 1: Building the RPM
First step would be to package our code into an RPM. To build an RPM, we first need to create a spec file - this basically dictates how to build the RPM - how to package the code, what dependencies to include, which scripts to put where, and what to run post install. Let’s look at some of these sections, called directives, in detail:
%build
This is the step where you would compile code - since we write python apps, we skip this step.
%pre
Anything to be done before installing goes here - creating users is an example.
%install
Think of this step as moving files around into the right places - it’s all about moving files from different sources into the BUILDROOT directory - the root for building and installing your package.
%files
Here you specify which files to include in the binary RPM. Usually you would have your application code, nginx configs, and startup scripts all included.
%post
This is the most important directive for us, as this is what pip installs the package and registers the startup scripts with chkconfig so that they may start on bootup.
%postun
This directive runs after you do yum remove [package]. It is essentially extra cleanup.
After creating a spec file, we build it (you need to install rpm-build package before you can build rpms):
$ yum install rpm-build

$ rpmbuild -ba [OPTIONS] hello-world.spec
And voila, you have hello-world.rpm file. This would then be pushed to some rpm repository so that it can be accessed in the future. The baking machine will need to have access to this repo to be able to pull in dependencies. We use artifactory, and add it to /etc/yum.repos.d on every build/bake machine.
Step 2: Baking the AMI
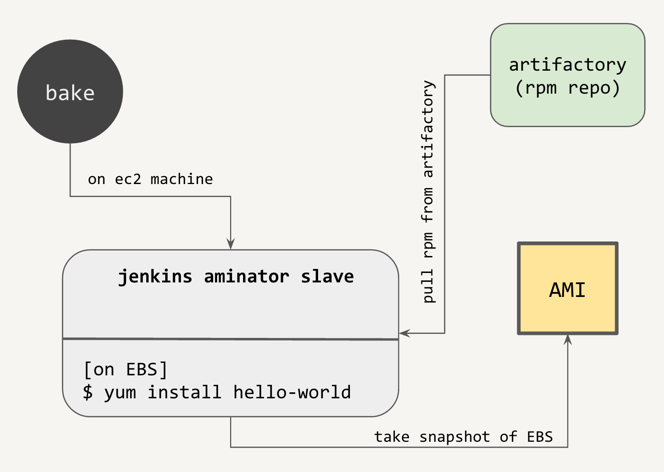
Now that you’ve created your RPM, it’s time to create the AMI. To reiterate, the resulting AMI would just be a base AMI that has our RPM (and all its dependencies) installed on it. Nothing else. Do avoid putting in unnecessary dependencies into RPMs that don’t need them, as the more there are, the more need to be installed, the longer the bake stage will take.
You could manually do this process by launching a new EC2 instance from a fresh base amazon linux AMI, configuring yum repos to point to your rpm repo, then installing your RPM on it, and taking an image. Thankfully, Netflix has created an automated tool for doing this, called aminator:
$ sudo /usr/local/bin/aminate -B $BASE_AMI --vm-type hvm $APPLICATION_NAME --partition 1 | tee aminate.out
Aminator first creates an EBS volume from the snapshot of the base AMI and mounts it onto the machine it’s being executed on. This is great because we don’t need to launch EC2 instances just to install our RPMs on them - we can do it right on the same machine. After mounting the volume, aminator chroots into it to provision the system with our RPM. After provisioning, aminator detaches the volume, makes a snapshot of it, and turns it into an AMI.
This is a very easy step in the process - all we need to do is make sure that aminator is installed on the machine that does the baking, and that yum repos are configured to see our rpm repo.
Step 3: Deploying into AWS
Now that we have our AMI ready to go, we need to do a one-time setup on AWS for our application. This consists of creating an Elastic Load Balancer(ELB) and a Route53 DNS entry pointing to the ELB. When we launch our application, we want to get to it by putting something legible into the URL, not something monstrous like this
internal-helloworld-test-**********.us-east-1.elb.amazonaws.com
Instead, we would create a new private cname entry, hello-world.internal-stitchfix-domain.com, and point it to the load balancer’s private IP. You can think of these steps as the “scaffolding” for the application - one time setup to create your application on AWS.
For this scaffolding and deployment, we wrote an in-house service called book-of-magic, to handle resources on AWS. To create our application, we run:
$ sfapp create_application hello-world --health-check-url /health_check --port 80 --protocol HTTP --env test
This creates our internal ELB, and adds an internal cname DNS entry on Route53 pointing directly to the ELB. Notice how for the scaffolding, we need to pass in the ELB healthcheck endpoint and port - this is the endpoint that the ELB will ping periodically to check if the instance is healthy and should be attached to the ELB. The protocol is also passed in:80 => 80 if HTTP and 443 => 443 if HTTPS. The environment is important, as every environment will have its own ELB and Route53 entry for isolation. Voila, the application scaffolding has been created and we are ready to begin a first deploy of the app:
$ sfapp deploy hello-world --env test --ami $AMI_ID --instance-type c4.2xlarge --min-instances 2 --max-instances 2
What this does is it creates a launch configuration with the AMI that we created - our immutable server - and sets the instance type. Then, an ASG is created from this launch configuration, specifying the min and max number of instances to have - by default we want at least 2 instances to always be up. This ensures that if one instance goes offline for any reason, the other will still be able to serve traffic while the ASG launches another instance up. Note how easy and interchangeable these instances are because they are configured to launch an EC2 instance from an image - the AMI that we made with our RPM installed on it.
Once all the instances are launched in the ASG and the healthcheck endpoint has been verified to return 200, the ASG gets attached to the ELB. This means that we can now go to hello-world.internal-stitchfix-domain.com and see our application!
Red-Black Deploy
So, what happens when we make some changes and want to deploy again? We no longer need to redo the scaffolding for the application - the ELB and Route53 entries have already been created and ELB configured with the correct ports and health checks. What we would need to do is:
- Build a new RPM (bump the version) + push it to our RPM repo
- Bake a new AMI
- Run
sfapp deploy hello-worldto create a new launch configuration and new ASG
Now, what happens to the old ASG that we previously deployed? While our ASG instances are launching, it is still connected to the ELB and serving traffic. Once the new ASG v2 instances are up and passing the health check, we attach the ASG to the ELB and detach the old v1 ASG. And voila, now hello-world.internal-stitchfix-domain.com is serving the v2 application, and the v1 ASG is inactive and can be destroyed without impacting the live deployment. This is called red-black deploy since we swap out the old ASG for the new one. There is no point where two versions are online at the same time.
Integrating Planned Terminations with Chaos
We have all our web apps and services deployed on AWS. Working in the cloud, we know that there can be unpredictable terminations of EC2 instances and we embrace this. So much so that we constantly create periodic terminations of EC2 instances for every deployed app, dashboard, and web service. We use Netflix’s open source chaos monkey to achieve this, and what chaos monkey does is every hour look at all the ASGs we have, and randomly terminate an instance in certain ASGs. It then repeats the process the next hour - we configured it so that every app is guaranteed to be terminated at most once a day.
“But why??” - you might ask. This is to build resilience to failure by having failure every day. Random termination also ensures that best practices are being followed and data is not stored on the instance itself. This is very important, as the immutable server pattern treats instances as disposable entries, and thus you should never, ever persist data on the instance itself. Not surviving a chaos attack puts this clearly into perspective for the developer, and the code is then refactored, data is persisted outside the instance, and the app is then fail proof to any unplanned failures (this is also why we encourage a minimum of two EC2 instances in each ASG - so that when one is terminated, the other can still serve traffic).
Pros and Cons of Immutable Server Pattern Deploys
Many people have criticized this deployment pattern for being too slow, too rigid, too inefficient. Because the server is immutable, it is true that redeploy iteration takes longer. You need to build a new RPM (3-4min), bake new AMI (7-12min), and deploy new ASG (5-10min). Having deployed many services myself, I can say that sometimes it does get a bit frustrating to do the whole iteration again just because I had some errors in the code. With a different deploy strategy that does allow mutating the server on the fly, these changes could be executed very quickly. However, mutating the code or scripts on the server itself also has disadvantages, like how the server might look different in a test environment than a prod environment. In the immutable server pattern, the AMI is exactly the same - whether it’s deployed in test or prod. This gives us more confidence that it will work in prod if it works in test. For us that is very important - once we know that our service is integrated and working well with engineering in the staging environment, we know it will work exactly the same once we deploy into production.
However, the iteration process is still slow and rigid - and this opened up an opportunity for us to build some tools to enable a faster testing cycle. For this, we used a docker image that was a close copy of an amazon linux machine (we used vettl/amazon-linux), provisioned it to see our RPM repo, and built a new docker image that could immediately be used to test the install of the RPM. Launching the docker image was much faster than baking and launching instances from the AMI - if you already pulled the image from the docker repo it was not even a contest - 1s to launch docker vs 15+ minutes to bake and deploy the RPM. This greatly improved our iteration process for testing the contents of the RPM and making sure the application was starting up correctly. Then, after testing the RPM there, the developer could bake and deploy the application into the test or staging environment, with much higher confidence than before that all the logistics of the application running successfully have been ironed out.
Last Thoughts
This deployment strategy might not be the most popular, with the use of Chef and Puppet, among others - but we feel the pros of using the immutable server pattern outweigh the cons. Again, being in the cloud, we highly value consistency and resilience to failure. If something is wrong on one of the instances running the application, we can terminate it at will, since every instance is disposable - a new one will launch and take its place from the same AMI as the rest. The issue of slow redeploy process was really the big frustration point, but we have solved this by adding tools to easily and quickly test the RPM before going through the full deploy process.
Next Step: Spinnaker
For the past couple months we have been working on integrating Spinnaker to manage our deployments. Also part of Netflix OSS, Spinnaker would give us the ability to define custom deploy pipelines - meaning that different teams could use different strategies, if they so wanted. One team could find that a rolling deployment would better suit their needs than a red-black deploy. Another team could do deploys using docker if they so chose. Spinnaker is also very self-service oriented, giving the developer all the power to view and manage his or her deployments. Stay tuned for a post on Spinnaker!